Planning a trip to India? The good news is that most US citizens can now skip the embassy visit entirely. The Indian e-visa system lets you apply from your couch, get approved in days, and land in India without a visa stamp hassle. Here’s everything you need to know.
What Is an E-Visa and How Does It Work?
An e-visa, also called an electronic travel authorization or ETA, is a digital visa approval you receive via email before your trip. When you arrive at an Indian airport or port, immigration officials will stamp your passport with the actual visa. It’s not a physical sticker in your passport beforehand—it’s an approval that lets you enter the country.
The process is simple: you fill out an online form, upload a photo and passport copy, pay the fee, and wait for approval. No office visits. No interviews. No printed forms to mail.
The Five Types of E-Visas Available
India offers five main e-visa categories, depending on why you’re visiting:
E-Tourist Visa – The most common option for vacation, sightseeing, visiting friends and family, and short yoga or cooking courses.
E-Business Visa – For attending business meetings, conferences, or trade discussions.
E-Medical Visa – For receiving medical treatment in India, including Ayurveda and other traditional medicine systems.
E-Conference Visa – If you’re attending an official government conference or seminar.
E-Ayush Visa – Specifically for studying or attending programs in Ayurveda, yoga, or other Indian healing systems.
Most travelers choose the e-Tourist visa. If your trip mixes purposes—say, some sightseeing and a business meeting—you can apply for one visa and include both activities, as long as the visa type covers your primary purpose.
How Much Does an Indian E-Visa Cost?
The fees are straightforward and affordable. For US citizens, here’s the official pricing:
| Visa Type | Cost |
|---|---|
| 30-day tourist (April-June) | $10 |
| 30-day tourist (July-March) | $25 |
| 1-year tourist | $40 |
| 5-year tourist | $80 |
All fees include a 2.5% bank transaction charge, which gets added when you pay.
The 1-year visa is popular because it gives you flexibility—you can visit once, multiple times within the year, and stay up to 180 days total. The 5-year option is perfect if you plan regular trips to India.
Consider adding travel insurance to your budget. Read our guide on the best travel insurance for India trips to protect your investment and cover unexpected medical emergencies abroad.
Processing Time: What to Expect in 2026
Here’s something important that changed recently: E-visas are no longer processed in 72 hours. As of late 2025, the Indian government now reviews applications during business hours Monday through Friday, and the official minimum processing time is 8-10 business days.
What does this mean for you? Apply at least 10-14 days before your trip to be safe. The website technically allows applications as close as 4 days before arrival, but waiting that long is risky if there’s any backlog.
Some applications still approve within 3-5 days, especially during off-peak seasons. But don’t count on it. Play it safe and submit early.
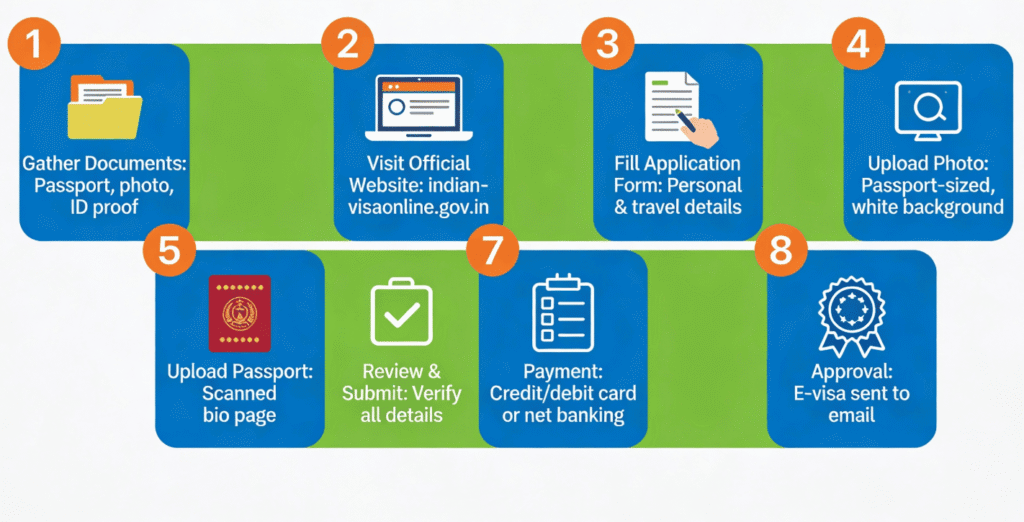
Your Step-by-Step Application Walkthrough
Step 1: Gather Your Documents
Before you sit down to apply, have these ready:
- Your valid passport (must have at least 6 months validity remaining and two blank pages for stamping)
- A digital copy of your passport data page (the page with your photo and personal info) in PDF format
- A recent photo with white background in JPEG format
Step 2: Visit the Official Website
Go to indianvisaonline.gov.in/evisa – this is the only official source. Don’t use third-party sites; they add unnecessary fees and middlemen.
Step 3: Fill Out Your Application
You’ll enter standard information: your name, date of birth, passport number, address, occupation, and travel plans. The form also asks about countries you’ve visited in the past 10 years and whether you’ve been to India before.
Important: Match everything exactly to your passport. Even a spelling variation can cause rejection.
Step 4: Upload Your Photo
This is where many people stumble. Your photo must meet specific requirements:
- Size: Between 350 x 350 pixels and 1,000 x 1,000 pixels (square format)
- File Size: Minimum 10 KB, maximum 300 KB
- Format: JPEG only
- Background: Plain white or light color, no shadows or patterns
- Face: Full front view, eyes open, centered in the frame, from top of head to bottom of chin
If your photo doesn’t meet these specs, your application gets rejected. Many people ask about “free” photo resizing tools online—they work fine as long as you follow the size and format rules above.
Step 5: Upload Your Passport Copy
Upload the page with your photo and personal details. Make sure the PDF is clear and legible—blurry copies get rejected.
Step 6: Review and Submit
Read through everything before hitting submit. Errors now are easier to fix than rejections later.
Step 7: Pay the Fee
After submission, you’ll receive an application ID and payment link. Pay using credit card, debit card, or digital wallets through the secure SBIePay or Axis Bank gateway. You’ll get a confirmation email immediately.
Step 8: Wait for Approval
You’ll receive status updates by email. Once approved (typically within a few days to two weeks), download your Electronic Travel Authorization. Print it or save a digital copy.
E-Visa vs. Visa on Arrival: Which Is Better?
You might have heard about “visa on arrival” for India. Here’s the truth: There is no official visa-on-arrival program for tourist travel to India. This is a common misconception.
India does allow direct air transit without a visa if you’re passing through and not leaving the airport (even then, you need an e-visa if you’re staying more than a few hours).
For tourists, the e-visa is your only online option. It’s actually better than a traditional visa anyway because you avoid embassy lines and get approval before you travel.
What’s a Transit Visa? Do You Need One?
A transit visa is for travelers passing through India to reach another destination. It’s valid for a single journey and lasts a maximum of 3 days.
You need a transit visa only if you’re:
- Leaving the airport
- Staying in India longer than a few hours
- Traveling by ship or train through India
If you’re just stopping over at an Indian airport for a connecting flight without leaving the terminal, you don’t need any visa.
Common Mistakes That Get Applications Rejected
The Indian visa system is automated, so errors trigger instant rejections. Here’s what to avoid:
Wrong Visa Type – Applying for a tourist visa when you’re actually attending a business meeting counts as misrepresentation and can cause denial or even blacklisting.
Spelling Mismatches – Your name must be spelled exactly as it appears in your passport. Even a missing middle initial causes problems.
Photo Failures – By far the most common rejection reason. Wrong background, wrong dimensions, bad lighting, or blurry images all lead to rejection.
Incomplete Forms – Leaving blank fields or entering placeholder text like “N/A” in required sections gets you automatically rejected.
Inaccurate Dates – If your application date of birth doesn’t match your passport, the system flags it.
Late Submission – Applying 2-3 days before travel when processing now takes 8-10 days is asking for trouble.
Missing Documents – Not uploading both your passport copy and photo means automatic rejection.
How to Avoid Mistakes Before You Submit
Double-check everything. Read the form twice before submitting. Use this checklist before hitting the final submit button:
- ☐ Name spelled exactly as in passport
- ☐ Passport number entered correctly
- ☐ Photo meets all size and quality requirements
- ☐ Birth date matches your passport exactly
- ☐ Visa type matches your travel purpose
- ☐ All required fields are filled
- ☐ Passport is valid for 6+ months beyond your arrival date
- ☐ You’re submitting at least 4-10 days before travel
Take screenshots of your application ID number before you submit. The website sometimes becomes unresponsive, and you’ll need that ID to track your application status.
What Happens When You Arrive in India?
You’ll have a separate line at immigration for e-visa holders. Present your printed ETA (or show it on your phone), along with your passport. An officer will verify your details and stamp your passport with the actual visa. The whole process usually takes 10-15 minutes.
Make sure your passport has two blank pages for the stamp. If it doesn’t, get a passport renewal before your trip.
Before you land: Review our complete India travel guide for first-time US visitors to know what to expect when you arrive, from customs procedures to local transportation options.
Your Approval Timeline: When to Expect an Email
Most approvals arrive within 3-5 business days. Some take up to 10 business days, especially during peak travel seasons (July-March).
The system reviews applications Monday through Friday only, during Indian business hours. If you apply on Friday, processing doesn’t start until Monday.
Check your email, including spam folders, regularly. Print or save your approval as soon as it arrives.
Can You Use an E-Visa Multiple Times?
Yes—if you’re a US citizen with a 1-year or 5-year tourist e-visa, you can enter India multiple times. The visa is valid for its entire validity period, and you can exit and re-enter as many times as you want within the validity window.
However, you’re limited to a maximum 180-day total stay on a tourist e-visa in a calendar year, regardless of how many visits.
Planning Your Trip? Get the Full Picture
Now that you know how to apply, you’ll want to prepare for your actual arrival. Check out our guides on India travel costs and budgets to plan your spending, and don’t forget to book accommodations at top-rated hotels in India before prices spike during peak season.
One Final Important Note on Processing Times
Don’t plan your arrival too close to your application date. The old 72-hour approval window no longer exists. The government now allows applications 120 days in advance for 1 and 5-year visas, or 30 days for 30-day visas—but uses business-day-only processing.
If your trip is confirmed, apply immediately. If your visa gets rejected, you’ll need time to reapply.